Create a Site with WordPress: Configuring MySQL Using phpMyAdmin
 YNOT – In the previous article, we saw how to configure Apache to prepare for the installation of WordPress.
Today we will focus on using WAMP and phpMyAdmin to configure MySQL, the database we installed.
WAMP (installed here) creates a root account in MySQL, but the security is very weak because no password is required to gain access to the root account. The first thing we will do is create a special access key to increase the level of security for our database.
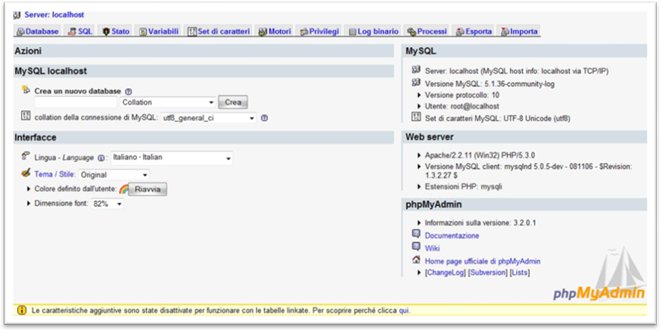
Launch WAMP, and then left-click on the system tray icon that looks like a tachometer. Select phpMyAdmin from the pop-up menu. Your default browser will open to an administration panel that will allow you to manage the database of your future WordPress site, as illustrated in the image below:

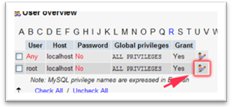
From the tabs at the top of the screen, select the Privileges heading and then select the icon next to the root user to change the security settings (illustrated below):

After clicking on the icon indicated by the arrow, type your password twice and then click the OK button to confirm your choice.
At this point, because we altered a parameter of root access we would get an error page if we tried to log in to the home of phpMyAdmin. To avoid that problem, we must perform a couple of updates.
If you left the default settings during installation, WAMP will have installed phpMyAdmin in the path C:\wamp\apps\phpmyadmin3.2.0.1, which may vary slightly depending on the version of the program that you installed.
To make the appropriate changes now, find the config.inc.php file and look for the following strings:
[PHP]$cfg[’Servers’][$i][’user’] = ‘root’; // MySQL user
$cfg[’Servers’][$i][’password’] = ‘’; // MySQL password[/PHP]
As you can see, the default username is “root” and the default password is blank. This is why you can no longer access phpMyAdmin after you changed the password as instructed above.
Let’s modify the config file by inserting the password you specified earlier. Place the password between the single quotation marks after the “=” sign in the password line, like so:
[PHP]$cfg[‘Servers’][$ i][‘user’] = ‘root’; // MySQL user
$cfg[‘Servers’][$ i][‘password’] = ‘YOUR_PASSWORD_HERE; // MySQL password[/PHP]
Save the changes you just made, and then try to log in to the phpMyAdmin panel to verify that all changes were completed successfully.
Before explaining how to create a specific database for the site you intend to create, it is good to do a little reflection on the security of your password.
The site that you will create, if all goes well and if the contents are really good, will have global visibility. You can be sure someone will try to undermine your security, attempting for example to steal customers’ usernames and passwords or in other ways do harm to your privacy.
Choosing a good password is the basis for the security of your site, so I advise you not to include any variant of the name of the site or your name or location, your birthday, or anything else that could be guessed. Incorporate at least one numeral and possibly special characters that are obtained by pressing SHIFT and any number on the keyboard. Your future customers will thank you for your foresight.
This article was written for YNOT by Eng. Antonio Lodesani. For more information, visit ingoccupati.blogspot.com(in Italian).[/lang]


